Friday, March 29, 2013

Damask w/Red - so pretty!

Happy Friday!
I love the combination of black/cream damask with rich red. 
This classy combination turned out beautifully on this 5x7 wall hanging. 
I started with a layer of book paper then added damask tissue paper by Hallmark, adhering and sealing with Mod Podge. The heart is made using the Large Heart Stencil by Wendy Vecchi. First I put down a light coat of gesso then colored it in with Faber Castell Gelatos. I used just a little pink in the center but mostly used red, blending it with my fingers. The shading is done with Faber Castell Big Brush Pen in cold grey III. The metal key comes in a brass finish and I colored it with Tim Holtz Distress Stain in brushed pewter. The words are in the "Traveling Typewriter" font. The edges of the piece and the words are distressed with Tim Holtz Distress Ink in black soot.
I am offering a class on this project at Cozy Crop House in Lititz PA. Check out their website and plan a retreat! The products I used can be purchased at the amazing eclectic Paperie online store, I have linked them up for you!
How do you like it? 
I truly appreciate your comments!

Friday, March 22, 2013

Blossom

Greetings!
What can you do with corrugated cardboard? - Lots of pretty things!

Check out all of the gorgeous projects the talented ~eclectic Paperie~ design team created with corrugated cardboard here! This is the canvas I created:

My canvas is 4"x12"x 1 1/2"deep. First I randomly rubbed "old paper", "pumice stone" & "frayed burlap" Tim Holtz Distress Stains all over the canvas. Then I took modeling paste on a spatula and scraped it all around, it picked up the Distress Stains, coloring itself as I moved it around. 

After that was dry I randomly applied "old paper" Tim Holtz Distress crackle paint. I set that aside to dry while I assembled my flower. 
I used a couple of different gauges of corrugated cardboard from packing boxes and a disposable cup cozie. On the flat piece of cardstock torn off one side of the cardboard I stamped the "She Script" stamp by Unity Stamp Company with Versa Mark Ink and heat embossed it with Zing black embossing powder. I used this for two of the leaves and one of the layers in the flower. 
The corrugated pieces are distressed with "black soot" Tim Holtz Distress Ink. All of the components are free hand cut. I layered them up with a vintage doily which was stiffened with Aleen's fabric stiffener and a pretty crocheted & beaded flower from a local fabric shop.
The "e-Team Picks Challenge" to use corrugated cardstock/cardboard on your project runs through April 3rd. I hope you are inspired to create something and link it up here!

Friday, March 15, 2013

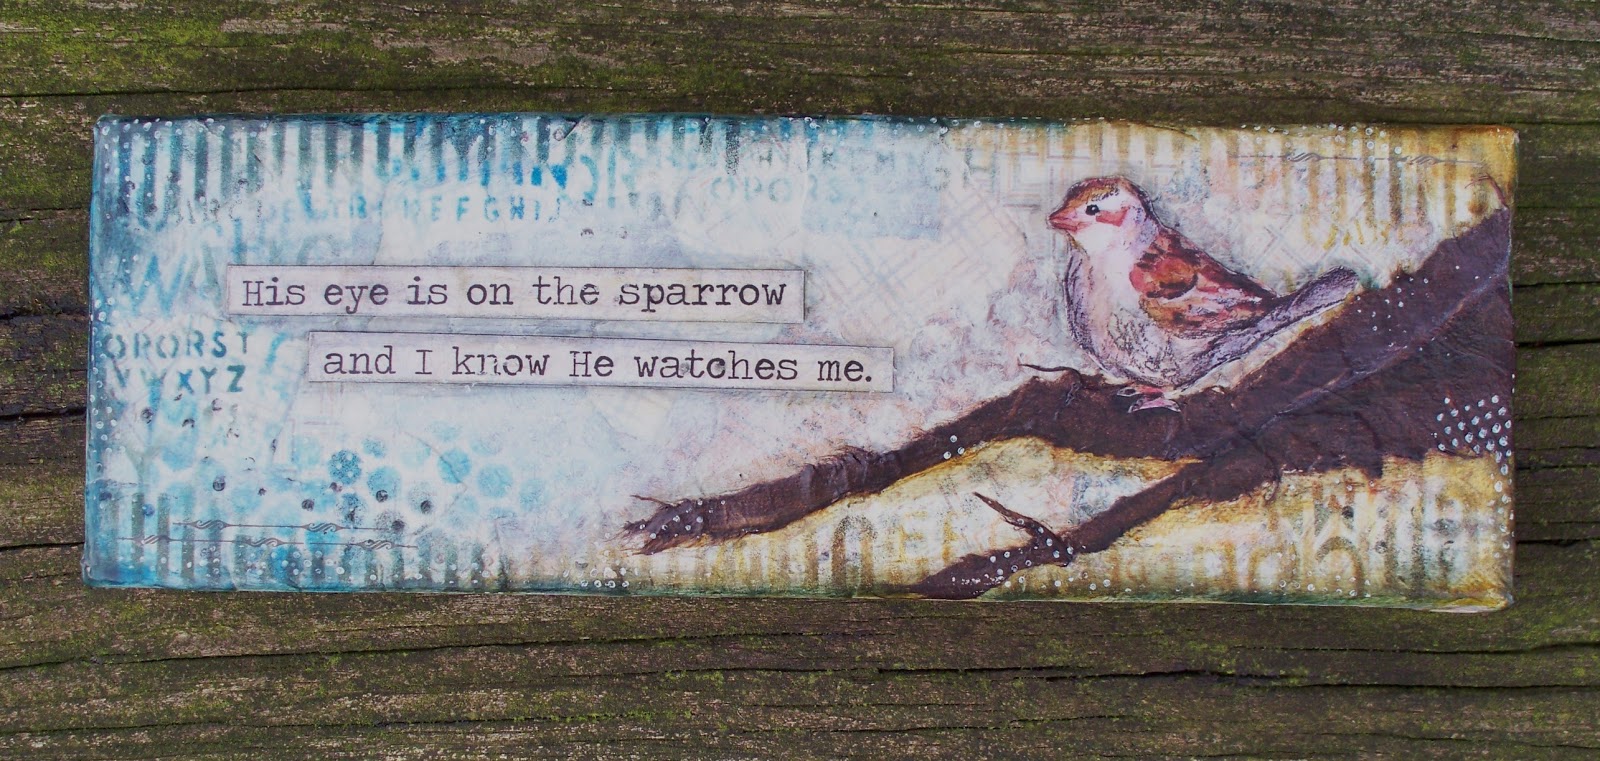
Sparrow Canvas

For those of you who didn't see my post at eclectic Paperie, 
I'm bringing it here to you today. 
Today I have a canvas to share with you.
This piece is 4" by 12"  and is 1 1/2" deep. I started by tearing paper from the "Hope" collection by Authentique into pieces approximately 1"x1" and collaging them on to the canvas I used blues in the upper left and blended to browns in the lower right. The patterns and colors were a little strong so I muted them with Claudine Hellmuth Studio Paints, these paints are nice and creamy and they are transparent so they let some of the color and pattern from the paper show through. 

Next came layers and layers of stamping with Staz-On inks through the Studio 490 Wendy Vechi Dots & Stripes Borders stencil and the dylusions 5x8 "letter jumble" stencil by Crafters Workshop as well as punchenella. The tree trunk is made with some mulberry paper from my stash. The sparrow is by Becca Kallem. I used Faber Castell Pitt pens over the printed image and blended all of the elements with Faber Castell big brush pens. 
The phrase is from an old hymn I love and on the back I put the write-up from Wikipedia about the origin of the hymn. 
I hope you are inspired to tear up some paper and make a collage project of your own, the shop at eclectic Paperie has all of the wonderful goodies you'll need - 
thanks for playing with me!

Saturday, March 9, 2013

Spring nest

Oh SPRING! It will be here shortly! 
Tonight we bump the clocks ahead which will make our evenings lighter longer - spring can't be far off! 
I've created a spring shadowbox with a stamped nest and little birdie in it to share with you today. 8"x8"


The current challenge at eclectic Paperie is to use recycled fabric in your mixed media project. I have an old wallpaper sample book that also has fabric samples in it and that is where this project began. This is the wallpaper book:
 and this is the fabric sample I used:
First I stamped the adorable nest from this Stampers Anonymous Easter Blueprint Stamp Set on to the fabric. 
I stamped it twice more on to patterned paper, cutting one out, and laying washi tape by My Minds Eye over the other one to cut out the eggs. 
All of the paper I used is from the Authentique "Hope" collection, it is a beautiful muted blue/brown/tan color palette. On the background paper I did some stamping and inking through punchenella with Distress Ink in Brushed Corduroy and Walnut Stain. A piece of vintage book paper from an old bible study book makes a nice layer between my fabric piece and the background paper. 
A metal leaf, tab with the word "life" on it, and brad by Tim Holtz Idea-ology bring some deeper color and another layer to the piece. Some twine by American Crafts wrapped around the top took up an awkward bit of white space. I frayed the edges of the fabric and colored it with Faber Castell Pitt pens in different shades of brown.  I was very please with how this all came out but then what to do with it? 
I didn't want to mount it to a canvas because I liked how the vintage book paper  was dimensional on the background and I knew it needed to be protected. Off to Michaels to find a shadowbox and WOOT! - there was this one on clearance for a penny! YES, a penny!!!! I have had this happen before at Michaels, when there is only one of something left, they sell it for a penny - amazing. Anyway, I found a little birdie and some moss and this project was coming together nicely! 
I lined the inside edges of the box with paper from the same Authentique "Hope" collection to help brighten up the inside of the box and glued the moss and bird to the bottom.
 Do you have any bits of fabric laying around? Make a project and share it with us at eclectic Paperie - we'd love to see your work and there is a random draw among the entries for a nice gift certificate to spend at the eP shop!
Thanks for stopping by, I appreciate your comments!

Friday, March 1, 2013

So excited to be joining eclecticPaperie !!

Greetings friends! 
I'm so excited to share that I am joining the design team at 
eP is an amazing online store with the very latest in mixed media and scrapbooking items. They have a fabulous blog where gorgeous projects are shared that will get your mojo flowing to create!
The owner sent me a box of beautiful product to play with and today I've made a few cards to share with you.
The gorgeous paper is by Authentic from the "Peaceful" collection. This paper is a heavy weight and superb quality - so yummy to work with. It is winter themed but, of course, I was drawn to all of the bird motifs on it.
I have used Spellbinders Die D-Lites Medallion Three on all three cards. This particular die is no longer available in the store but Medallion Four is and it is very similar (and it's on sale for half price - woot!). The package comes with two dies which can be used together or separately. 
On this card I die cut the solid medallion out of plain black paper and the perforated die out of patterned paper. The square behind the medallion is right off of the sticker sheet that comes with the paper pack. I used Memento Tuxedo Black ink to ink the edges and also to stamp on the background with the Unity Stamp Company She Script stamp. The little black flower in the center is by Offray and the "Happy Birthday" sentiment is a font called Santa's Sleighful.
On this card I've just used the solid medallion die and layered a Prima flower on top of it with a bird sticker from the paper pack pop-dotted in the center. The trim is by Making Memories and inking done with Memento Tuxedo Black.
The center for this card is cut using both the solid medallion and the perforated one together to make one piece. I've layered it on top of some tissue paper circles with a crocheted flower by Petaloo, brad by Making Memories, and leaves by Prima. I stitched around a piece of patterned paper and put black rhinestones by Prima in the corners then mounted it to the card base.

Thanks for joining me today! 
I hope you will hop over to eclectic Paperie to shop and check out the blog, and join me back here as I make more crafty fun with their products! 
I truly appreciate your comments! 
Have a lovely day!

Friday, February 22, 2013

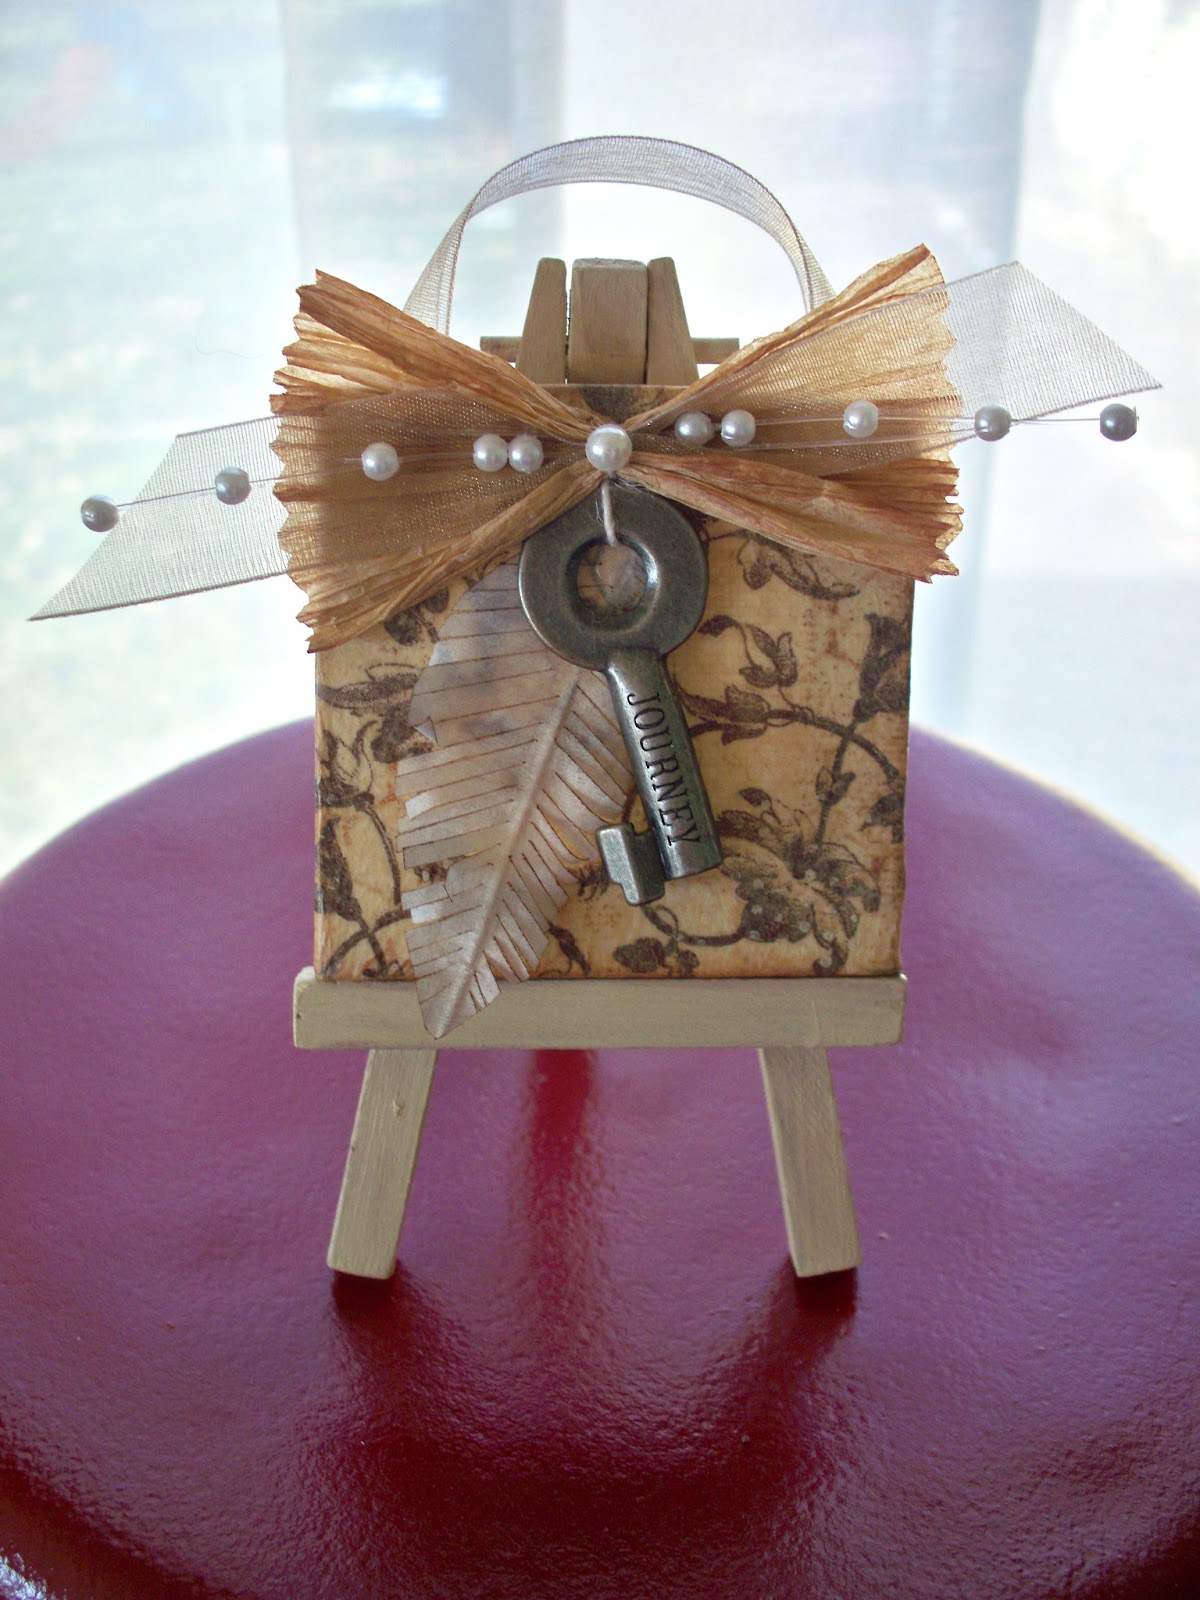
"Journey" mini canvas

Greetings friends and happy Friday!
Today I have a sweet little canvas to share with you. It is just 2"x2"! 
These little canvases come in a 2 pack at WalMart with their own little easels. I painted the easel with Liquitex acrylic paint in Unbleached Titanium.
The canvas is covered with vintage tissue paper that had been gifted to me. I made the feather out of regular parchment paper that is used for baking and the bow is made from rafia left over from Christmas wrapping. 
Everything is distressed a bit with Ranger Archival inks in Sepia and Coffee. The key is by Tim Holtz, pearls and ribbon are from the wedding department at Michaels. 
Instead of covering the back as I usually do with paper, I just put pretty washi tape by My Minds Eye from the Indie Chic line all around the exposed wood. 
What do you think, isn't it cute?
I am linking up with the "Layer it on and Share a Word" challenge over at Frilly and Funkie.
Please check out my other pieces by clicking the 
"Mixed Media Art for Sale" tab above.
Have a great weekend and come back next week for the announcement of the new design team I've joined!

Friday, February 15, 2013

Frosted Designs - Be Bold!

The new challenge is up at Frosted Designs and the theme is
BE BOLD !!!
Use bold colors or bold patterns (or both) on your card, layout, or off the page project and share it with us at Frosted Designs!

I've used some very bold acrylic paint colors to create these Faith Cards out of playing cards.
 A layer of gesso goes on first, then acrylic paint, stamps and ink. A butterfly cut from a pretty napkin and then a key word taken from the bible verse that appears on the back of the card. 
Coat both sides with a nice layer of Mod Podge and you have a beautiful reminder of God's love to hand out.
Here are the backs:
I have had three wonderful terms as a designer with Frosted Designs and this is my final post with them. They have a bunch of talented new designers coming on board to inspire you. I plan on continuing to play along with them and hope you will too! Stay tuned for an announcement of a new team I've been invited to join!

Thanks for looking, I appreciate your comments!

Friday, February 1, 2013

"Love" altered frame

This week's Fabulous Friday Challenge at Frosted Designs is to 
use hearts and the word "love" on your project. 
I've embellished this 10"x10" frame with a banner and rosettes:
The opening is 7.5"x7.5" so a 4"x6" horizontal photo will fit nicely just below the banner.
My inspiration for this project came from one shown on page 16 of the Close To My Heart Spring/Summer 2013 idea book. Unfortunately they don't have it up on their site yet so I can't create a link to it for you.
Supply list: Patterned paper used for the banner and the rosettes is called Crimson Swirl by Rhonna Farrer, it is from deep in my stash and is copyrighted 2007! The burgandy cardstock is from my stash. I had stamped it with Antiqued Bronze Distress Stain while attempting a different project that didn't work out - so in the scrap bin it went to be reinvented today as part of my love banner! All paper has been inked with Tim Holtz Distress Ink in Mahogany. The letters and flourishes are Tim Holtz Grungeboard. The letters were colored with Metalic Rubs by Craft-T Prodcts in Gunmetal. The flourshes were first colored with Metalic Rubs by Craft-T Prodcts in White Sparkle, then with Fapber Castell Pitt Artist Pen in Light Green #171. The rosettes are made with a Tim Holtz Sizzlits die and embellished with pearls by Prima Marketing. The pearls on the letters are by Recollections, buttons are from my stash, and black twine is by American Crafts. The banner is cut with Spellbinders Nestabilities Labels #17 die and the hearts are cut with Lifestyle Crafts Scalloped Heart die. The pearl sprays are from the wedding section at Michaels.
I hope you are inspired by my project and will create a card, layout, or off the page project to link up with us at Frosted Designs!
Thanks for looking! 
I appreciate your comments!

Saturday, January 26, 2013

Collaged box w/bird

Today I have an altered box to share with you.
It started out as this "Gone With the Wind" deluxe VHS tape set (Thanks to my Mom for the trash to treasure!):


Here is what I created out of it: 
(click on pictures to enlarge and clarify)
The inspiration for this started with this rub-on. It is by Prima Marketing from their Melody collection. I rubbed it on book paper torn from a daily devotional book, then used a little Ranger Distress Ink through punchenella on it. I was so pleased with how it looked, it led me to find papers to use with it to collage the box.
I tore paper by Prima Marketing from their Songbird collection and randomly collaged it on along with more of the pages torn from the devotional book
I added more rub-ons by Prima, K&Co, and Kaiser Kraft as well as random stamping and stenciling with acrylic paint and Ranger Archival Inks.
Then I painted the bird using one I found at a free clip art site as a guide. Paints by Claudine Hellmuth were the perfect colors to paint my bird and they are a little bit sheer to let the background show through ever so slightly. On top of the paints I added Ranger Perfect Pearls in Turquoise, Blue Patina, and Blush. The shimmer is really beautiful but unfortunately I couldn't get the camera to pick it up.
I used Washi Tape by My Minds Eye from the Indie Chic collection to finish off the edges of the opening for the drawer to slide in and out of and, of course, I finished the back:
and sides:

I added the knob and now have a beautiful box to keep my Gelatos in. Twelve of them fit perfectly in the space where the VHS tape sat - see them peeking out? These are the only twelve I have so now I "must" get twelve more to fill the other space!
The Mod Podge I used is "Mat Antique" and I love the yellowed look it gave to the papers.
I am entering my box in the following challenges:
Frilly and Funkie - "Spruce it up"
Eclectic Paperie - "Altered Box"
Happy Daze - "Recycled"
Thanks for looking! I appreciate your comments!